smog check

A Few Facts About Smog Check In Vacaville, California

Are you currently residing in California? Do you make sure that your vehicles are undergoing regular biennial smog inspection? Yes, you will need to do that in order to renew your registration. If you are a new resident of California, you will be required to get an initial smog check or inspection done if you want to successfully register. And this will apply to you and your vehicle even if you have your current certificate on you. So if you’ve gotten one from your previous state, you will still have to go through a test to acquire a new one here. You can find a testing facility at your nearest smog check station. They should be DMV-approved locations and can be anywhere across your county. Remember, typically you will not be required to go through any safety inspections for registration or renewal.

How Is It Going To Affect New California Residents?

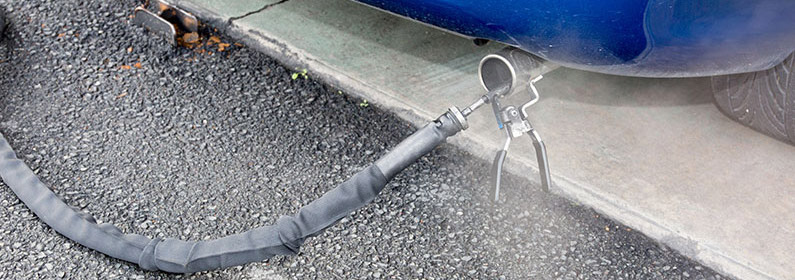
As a new resident of the state you will be required to take your vehicles to a smog inspection station near you as per the California Department of Motor Vehicles (DMV). In any case a smog check has to be completed within 20 days of establishing residency and before registering the vehicles. Remember all your current, out-of-state smog inspection certificates or stickers or approvals are not going to be enough to acquit you of this requirement. You will have to complete an initial smog check in Vacaville and from there onwards you will be subject to the standard 2 years schedule of recertification.

Just as there is no need for you to go through regular vehicle safety inspections, there will be no need for any brake and light inspection either but you will be required to present your vehicle identification number (VIN) inspection when you first aim to register your vehicle after moving to the state. This inspection will take place at the DMV.

What Are Some Of The Most Common Smog Check Requirements & Exemptions You Should Know Of?

There are counties across the state that require a smog inspection every 2 years and for that the CA DMV has a biennial smog certification program. However there are a few exceptions / exemptions to this rule and they are as follows. The state of California requires all automobiles / vehicles to go through smog inspection EXCEPT:

·    Vehicles powered by Gasoline, model year 1975 and older

·       Vehicles powered by natural gas that weigh over 14,000 lbs

·       Vehicles powered by Diesel, model year 1997 and older OR same vehicles with a gross weight rating of more than 14,000 lbs

·       Electric vehicles

·    MotorcyclesThese were some basic facts about smog check in Vacaville, California and their exemptions. Be mindful of them when you go through your biennial test.


Smog Check and Its Importance

Smog Check and Its Importance

A smog check is a vital part of vehicle maintenance as well as taking a step ahead to preserve the environment. Ever since the laws and regulations for the vehicles which are high on smog are strengthened, they have been of great benefit to reduce the pollution and smog level in the entire United States. Therefore, Smog Check in Vacaville is not only helping to establish control over the number of pollutants in the air but also assists to keep a check on the vehicles that should not be permitted to move on roads causing the high level of pollution.

However, depending upon the condition of your vehicle, you may have to go through three different options of choosing an authorized station which is recommended by the BAR (Bureau of Automotive Repair) in California. First are the test stations which are only for smog test and not for any repairs or diagnostic checks. The second we have the test and repair stations which can help you with checks and repairs for making your car stay under the vehicle smog guidelines. The third type of smog stations which you may need is the authorized emission related checks that only work on the emission of the vehicles.

When your vehicle goes through a smog check on an authorized place like Star Smog Station, your vehicle would be inspected for so many different components. It may need to work on emission systems, engine lights, fuel system, tailpipe emissions, onboard diagnostics and it is necessary that your vehicle should pass all the visual checks and functional inspection to get certified for smog limits.

Though there are a different set of conditions for which your vehicle is considered as eligible for checks. For instance, if you are driving a vehicle which is 20 or more year old with a hybrid, flex fuel or gas power source, then it may necessarily need a smog check. While for the vehicles which are no older than 6 years, then in such case you can skip the need to visit a smog station.

So, if you are still having any doubt regarding the smog check and its importance to drive on the highways, make sure you search for a “Smog Near me” to get professional assistance.

certified smog check station

Is My Car Ready for a Smog?

Most 1996 and new vehicles have on board computers called an On Board Diagnostics II monitors (OBDII). OBDII contains information which is used to conduct smog tests, and determine smog test readiness. On average, there are 8-11 monitors that OBDII provides, and all these monitors must be in a ready state in order for a smog test to be completed. If you have changed your car battery, or disconnected power to your car, your readiness monitors can get reset. That means you need to drive your car in a variety of conditions in order to “exercise” the OBDII system and get the monitors in a ready state. If your car is not in a ready state, the smog check cannot be conducted.

Do All OBD2 Readiness monitors need to be “Ready”?

The United States EPA has a slightly looser standards than California. For 1996-1999 cars, two monitors can be in a not ready state. For 2000 and newer cars, the United States EPA allows one monitor to be in a not ready state.

In California:

  • Gasoline Vehicles
    • 1996-1999 Gasoline Vehicles can have 1 monitor not-ready
    • 2000 and newer gas vehicles must have ALL monitors in a ready state with the exception of the EVAP monitor.
  • Diesel Vehicles
    • 1996-2006 Diesel Vehicles can have 1 monitor in a not ready state.
    • 2007 and newer Diese vehicles can have 2 OBD2 monitors in a not ready state

How did my car get into a not ready state?

  • Battery disconnected or replaced. For example, if you have recently jump started your vehicle due to a weak battery, it’s possible the monitor information has been reset.
  • Vehicle computer updates or requiring an update
  • A problem either indicated by a check engine light, or soon to be reported by the check engine light
  • Clearing out the OBDII monitors using a scan tool.

Getting your OBD2 Monitors Ready – Performing a Drive Cycle

In order to get your vehicle in a ready state, you need to drive your vehicle in different conditions. This will naturally occur over time if you have not had any battery issue, or if there is no problem with your vehicle. But if you want to make sure, or you know you need to conduct a drive cycle, follow these instructions. Please note that depending on the model, make, and year of the vehicle, you will need to perform certain steps in order to get all the monitors in a ready state. You can follow the general instructions, or find your specific vehicle instructions below.

Generic Vehicle Drive Cycle Instructions

Here are general instructions which should work for most vehicles. You should follow all traffic laws. You can perform this later at night so that there is less traffic. Don’t forget to be safe!

  • Cold Start. Don’t leave your keys in prior to the cold start. (For example, after leaving the car overnight)
  • Idle for 3 minutes with electrical equipment on (A/C, headlights, and rear defroster turned on)
  • Turn off A/C and rear defroster.
  • Put the vehicle in gear, drive up to 35mph, and come to a complete stop. This should just be natural city driving for a few minutes.
  • Get on a freeway, accelerate smoothly to 55mph and maintain speeds for 3 minutes
  • Decelerate down to 20mph without braking or depressing clutch (for manual transmissions). Turn on hazard lights as needed.
  • accelerate smoothly to 55mph and maintain speeds for 5 minutes
  • Decelerate down to 20mph without braking or depressing clutch (for manual transmissions)

That’s it. You should be set to get to Boutique’s smog check now!

General Motors Drive Cycle

General Motors Drive Cycle For Smog Check

In order to get all your OBD2 monitors for your GM (Chevy, Buick, Cadillac, GMC, Pontiac, Oldsmobile) vehicle ready, please perform the following steps:

  • Start the vehicle from a cold start. The time to do this is if you have not driven the vehicle for a few hours and the engine coolant temperature is less than 50 degrees F.
  • Let the engine run on idle. Turn the A/C and rear defroster on. You are trying to apply electrical load to the system.
  • Accelerate to 55 mph.
  • Hold a steady speed of 55 mph for 3 minutes
  • Let go of the accelerator and coast until the vehicle hits 20mph. Don’t apply brakes to slow down.
  • Accelerate again until 60 mph.
  • Hold steady for 5 minutes at 60mph for 5 minutes.
  • Decellerate (coast to slow down).
  • You may need to repeat steps 3-8 a few times if the battery was disconnected recently.
Toyota Drive Cycle

Toyota Drive Cycle OBDII Readiness Monitors

Toyota has various OBD2 readiness monitors for emissions testing, and by conducting a Toyota Drive cycle, you can activate and ready the Toyota ODBII sensors. If your smog technician tells you the specific drive cycle to perform, you can focus on just triggering that drive cycle. Otherwise you need to exercise each of the types of monitors. You should not need to perform all 11 procedures – just those specific to your model.

Toyota Drive Pattern 1 – EGR Monitor

Toyota-Drive-Pattern-1-EGR-Monitor

Toyota Drive Pattern 2 – EGR Monitor

Toyota-Drive-Pattern-2-EGR-Monitor

Toyota Drive Pattern 3 – Catalyst Monitor – O2S Type

Toyota-Drive-Pattern-3-Catalyst-Monitor-O2S-Type

Toyota Drive Pattern 4 – Catalyst Monitor – AF Sensor Type

Toyota-Drive-Pattern-4-Catalyst-Monitor-AF-Sensor-Type

Toyota Drive Pattern 5 – EVAP Monitor – Internal Pressure – Non Intrusive

Toyota-Drive-Pattern-5-EVAP-Monitor-Internal-Pressure-Non-Intrusive

Toyota Drive Pattern 6 – EVAP Monitor – Vacuum Pressure Monitor – Intrusive

Toyota Drive Pattern 7 – EVAP Monitor – Without Leak Detection

Toyota-Drive-Pattern-7-EVAP-Monitor-Without-Leak-Detection

Toyota Drive Pattern 8 – EVAP Monitor – Prius

Toyota-Drive-Pattern-8-EVAP-Monitor-Prius

Toyota Drive Pattern 9 – Oxygen Sensor Monitor – Front and Rear O2S System

Toyota-Drive-Pattern-9-Oxygen-Sensor-Monitor-Front-and-Rear-O2S-System

Toyota Drive Pattern 10 – Oxygen Air Fuel Ratio Sensor Monitor – Front AF Sensor and Rear O2S System

Toyota-Drive-Pattern-10-Oxygen-Air-Fuel-Ratio-Sensor-Monitor-Front-AF-Sensor-and-Rear-O2S-System

Toyota Drive Pattern 11 – Oxygen – AF Sensor Heater Monitor

Toyota-Drive-Pattern-11-Oxygen-AF-Sensor-Heater-Monitor


Ford Motors Drive Cycle

Ford Motors Drive Cycle Readiness for Smog Check

Ford Escort and Ford Probe 1.8L Engine
Prequisites: Cold Start, Fuel level between 15% and 85%. All accessories off

Start the vehicle and idle for 5 minutes.
While in park or neutral, rev the engine to 2500 rpm for 15 seconds
While in park or neutral, rev the engine to 4000 rpm for 15 seconds
Let the idle engine for 20 seconds with the cooling fan stopped
Drive towards a highway, and accelerate to 55 mph, maintaining that speed for 90 seconds
Decelerate to 15 mph and drive for 13 minutes at speeds between 15-35 mph
Maintain a 25 mph speed for 30 seconds

For Mercury Villager
Prequisites:
Start the vehicle and idle until ECT is above 160F.
Idle for 90 more seconds
Drive towards a highway, and accelerate to 56 MPH. Automatic Transmission in D and overdrive ON. Coast for 10 seconds.
and accelerate to 56 MPH and drive for 10 minutes at that speed.
Stop and idle for 20 seconds
Accelerate slowly to 25 mph (take 10 seconds to reach that speed). Hold accelerator for 20 seoncds.
Repeat the stop and accelerate cycle 8 times

accelerate to 56 MPH for 6 minutes and keep foot on accelerator.

Other Fords
Prequisites: Cold Start, Fuel level between 15% and 85%. All accessories off

Start the vehicle and idle for 4 minutes.
Idle the vehicle in Drive for 1 minute.
Drive towards an empty street or highway, and accelerate to 45 mph slowly. Stay in second gear for 5 seconds during this acceleration. Get to the 5th gear.
Maintain a 45 mph speed for 30 seconds
Stop the vehicle.
Idle the vehicle in Drive for 1 minute.
Drive at 25 mph and drive for 15 minutes at speeds between 15-35 mph. Within this time, stop at least 5 times, and have at least 3 periods of steady speed for 90 second durations.

Drive the vehicle between 45-60mph for 8 minutes.
Maintain a steady speed between 45-60mph for 5 minutes.
Drive the vehicle between 45-60mph for 8 minutes.
Stop the vehicle and idle for 40 seconds.

chrysler_dodge_jeep_ram

Chrysler Drive Cycle – ODB2 Readiness Monitors

Jeep, Chrysler, and Dodge Drive Cycle

For all drive cycles, make sure the check engine light (MIL) is off.

All Monitor Drive Trace

Pre-Conditioning Requirements:

>> MIL must be off

>> Cold start (Note: cold start temperature is undefined)

Driving Procedure :

1) Warm engine up for five minutes (must reach closed loop)

2) Drive (with steady throttle) at a speed between 40 and 60 mph for 8 minutes.

3) Stop and idle for 3 minutes.

4) Drive (with steady throttle) at a speed above 20 mph for 2 minutes.

5) Turn key off, leave off for ten minutes (to run O2 sensor heater monitor).

Note: Due to the limited preconditions provided with this drive trace, NCVECS recommends using the monitor specific drive traces for Chrysler vehicles.

Catalyst Monitor Drive Trace

Pre-Conditioning Requirements:

>> MIL must be off.

>> No DTCs present.

>> Fuel level is between 15% and 85% full.

>> ECT above 70º F.

>> Engine must have run at least 90 seconds

>> Engine between 1,350 & 1,900 rpm.

Driving Procedure :

1) Idle vehicle for five minutes (to reach closed loop operation).

2) Drive with a steady vehicle speed between 30 and 45 mph for 2 minutes.

EGR System Monitor Drive Trace – Vacuum controlled

Pre-Conditioning Requirements:

>> MIL must be off.

Driving Procedure :

1) Idle vehicle for five minutes (to reach closed loop operation).

2) Drive with a steady vehicle speed between 40 & 60 mph for 8 minutes.

EGR System Monitor Drive Trace – Electronic

Pre-Conditioning Requirements:

>> MIL must be off.

>> MAP must be between 0-60 KPa.

>> Engine speed between 500-850 rpm.

>> ECT is above 180º F (90º C).

>> No misfire temporary (pending) or matured fault present.

>> A/C clutch, PS Switch and Cooling fans do not change state (turn off).

Driving Procedure:

1) Idle vehicle for five (5) minutes (to reach closed loop operation).

2) Drive with a steady vehicle speed between 40 & 60 mph for 2 minutes.

3) Idle vehicle for three (3) minutes.

Note: This monitor evaluates EGR flow based on a change of engine roughness (idle stability). Conditions causing un-stable idle will prevent this monitor from running.

Evaporative System Monitor Drive Trace
Trace 1: Standard Type – Make sure that your fuel level is between 50% and 85% full.
Idle for 5 minutes
Smoothly accelerate and maintain a speed between 30 to 45 mph for 2 minutes.

Trace 2: Leak Detection Pump
From 6-8 hours of the vehicle being off (cold soak), idle for 5 minutes
Drive in city traffic naturally with stops and acceleration for 5 minutes.
Stop. Idle vehicle for 4 minutes.

O2 Sensor Monitor Drive Trace
Idle for 5 minutes
Smoothly accelerate and maintain a speed above 25 mph for 2 minutes.
Stop and idle for 30 seconds.
Smoothly accelerate and maintain a speed between 30 to 40 mph
Repeat idle and acceleration to 30-40 mph five times.

O2 Sensor Heater Monitor Drive Trace
Idle for 5 minutes, then shut the engine and leave the vehicle off for 10 minutes.

When the monitors are completed, you are ready to go to the smog station.

Source: https://img.neons.org/AGN/chrysler_drive_cycle.pdf

Honda and Acura Drive Cycle

Honda and Acura Drive Cycle

The Honda and Acura Drive Cycle is included in recent owners manuals. Additionally, Honda and Acura will indicate, on vehicle startup of the readiness monitors are set. When you turn the ignition to On-2 without starting the engine, the MIL will come on for 20 seconds. If the MIL turn off again, then the readiness monitors are set. If they blinks five times, the readiness monitors are not set and you need to conduct the Honda Acura Drive Cycle for smog check readiness.

Prerequisite : The gas tank should be 3/4 full and the vehicle has been stopped with the motor off for 6 hours or more. Ensure the air temperature is approximately 40° and 95°F.

  • Start the motor and keep the car idle for 20 seconds. Don’t touch the accelerator.
  • Rev the engine to 2000 RPM for 3 minutes. The temperature should be at 1/3 of the scale or higher.
  • Idle for 20 seconds again.
  • Go to a highway and drive between 50-60mph for 20 minutes. You should be in D or 5th gear. Don’t utilize cruise control. At some point in the journey, coast for 90 seconds (take your foot off the accelerator).
  • Conduct city driving for 10 minutes, and during this time, perform some coasting.
  • Once completed, let the vehicle turn off and sit for 30 minutes with the engine off.